
Deciding Where to Tap
When trying to decide where to tap:
- Select an area on the trunk where no previous taps have been drilled
- Avoid drilling directly above or below tap holes from previous seasons

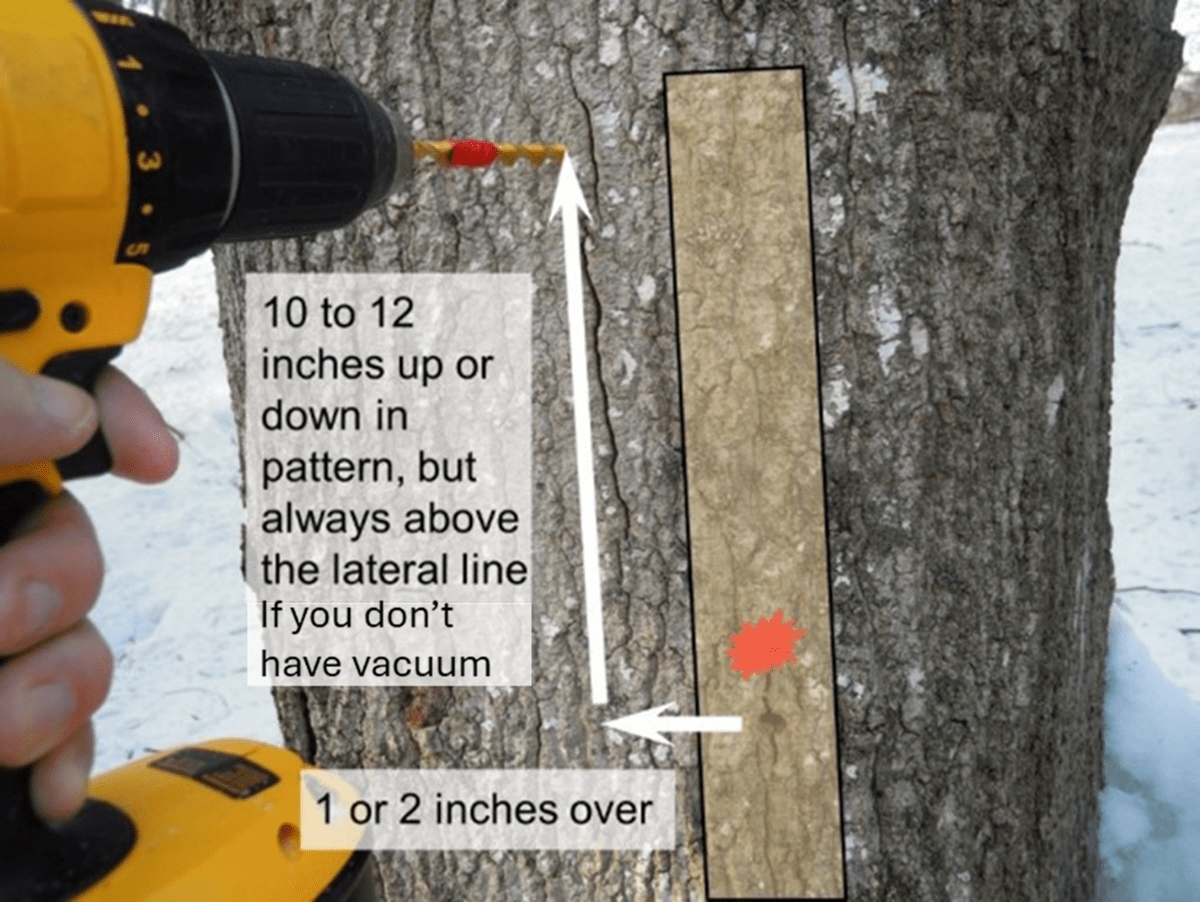
- Alternatively, locate an area where more than 2 inches of new sapwood has grown over previous tap holes and non-conductive wood
- This can be very difficult when you can’t see into the trunk, or where no systematic tapping pattern has been followed over the years
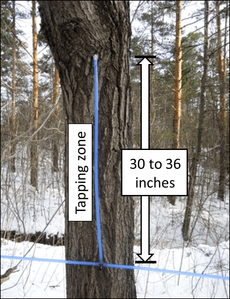
- Although southern exposures may thaw faster than shaded north facing sapwood, it is important to utilize the full circumference and height of the tapping zone when installing taps
Tapping below the lateral line
Tapping below the lateral line will allow producers to tap lower on the trunk into areas that have not previously been tapped. A larger tapping zone on the trunk will significantly improve the availability of clear sapwood for tapping, and less need to drill more than one tap hole per spile, when fresh clear sapwood is scarce and hard to locate.
Having a good vacuum system and excellent tubing sanitation practices (discussed here) are necessary for tapping below the lateral line. Sap is more prone to pooling in the dropline and into the spout. If this occurs, the taphole will likely close earlier due to bacterial contamination. To prevent this from happening it is highly recommended that spouts be oriented downwards to create an airgap. It is also highly recommended that check-valve spouts be used to prevent sap from draining back into the taphole. Using high vacuum will help keep droplines drained between sap flows.
Keep the following tips in mind if you try lateral tapping:
- Check-valves can be helpful to prevent sap flowing back into the taphole, especially if you have a mechanical releaser
- Make sure the tubing connection is facing downward
- Placing the spout and dropline below the lateral line may increase chance of animal damage – be sure to keep it out of reach of animals
- Place the spout and dropline above the snow line
- Sap tube collection systems that operate using high vacuum (25 to 28 inches of vacuum) may be able to keep sap tubing drained of sap between runs
Preserving Sapwood: A Critical Consideration
Quickly growing new sapwood (annual growth rings) and preserving conductive sapwood is the objective of managing a healthy sugar bush. Every time a tap hole is drilled, a quantity of healthy sapwood around the hole will never flow sap again. This sapwood becomes darker and is called a stain column or non-conducting sapwood. The stain column remains permanently fixed inside the sapwood and enables the tree to maintain internal sap pressure during spring and summer to enable the canopy to form unhindered.
This happens because trees will react to tap holes as a wound near the end of the sap harvest season. Trees can stop leaking sap similar to our ability to stop the flow of blood from minor injuries. They will begin permanently plugging the hollow wood fibres inside the sapwood above and below the drilled holes.


Two models of stain columns to represent the approximate volume of good sapwood that is permanently removed from future sap flow.
Non-conducting wood accumulates inside the trunk with each passing year as trees are tapped. Therefore, minimizing the number of holes drilled into the tree will help preserve more sapwood for future tapping.

How to Preserve Sapwood
- Make sure your sugar bush is healthy
Healthy sugar bushes that are located on fertile soil and are managed using good forestry practices can generally sustain larger diameter tap holes, assuming that tapping guidelines are followed. Here, new sapwood will accumulate each summer to ensure there will always be an adequate tapping area on the trunk for maple syrup production. See “Tree Health” for more information.


2. Locate taps evenly around the tree
Concentrated tapping is not sustainable for the tree. Utilize the entire circumference of the tapping zone, not just the southern exposure since there are no differences in total sap yield.
This will ensure that all non-conductive wood is spread out adequately, to always have clear sapwood for future tapping.

3. Use smaller drill bits
Each tap hole generates approximately 20 to 30 cubic inches of non-conductive wood within the sapwood. Small drill bits (4\16th or 3/16th inch) will generate significantly less non-conductive wood than standard bits (5/16th). Tapping crews must visualise under the bark where these stain columns are, to avoid drilling into stained wood that will not conduct sap.
4. Drill a shallower taphole

Non-conductive wood forms a little deeper than the depth of the drill bit. Taphole depth should not exceed 2 inches, including bark. Limiting tap hole depth to no more than 2 inches helps reduce the stain column and lowers the risk of drilling into an old, deeper stain column which could increase damage to the tree and cause a punky off flavour in syrup. Many producers with vacuum tubing use 1.5-inch tapholes. Reducing the tap hole depth to 1.5 inches will increase sustainability, while preserving 80% of the yield compared to a 2-inch taphole under vacuum. A 1-inch taphole should be considered for small or slow-growing trees. A 1-inch taphole will produce about 55% of the yield compared to a 2-inch taphole under vacuum.
The content in these pages was originally created by Todd Leuty (previous Agroforestry Specialist), and edited by Jenny Liu (Maple, Tree Nut, and Agroforestry Specialist) and Dr. John Steele (current Maple, Tree Nut and Agroforestry Specialist).